English
Installation and Usage Guide for 3X-UI Panel

3X-UI is a multifunctional web panel for managing VPN servers, supporting various protocols such as VMess, VLESS, Trojan, ShadowSocks, and WireGuard.
This panel provides easy management of VPN connections, configuration of multiple users, and setting limits on traffic, expiration dates, and IP addresses.
3x-ui Features
- Multilingual interface (English, Persian, Chinese, Russian, Vietnamese, Spanish)
- Support for multiple protocols (VMess, VLESS, Trojan, ShadowSocks, WireGuard)
- Multiple user management
- Setting limits for traffic, expiration dates, and IP addresses
- Automatic SSL certificate management
- Intuitive web interface
- Traffic usage statistics
- Ad blocking and traffic routing capabilities
- Support for Reality technology to bypass restrictions
Installation
Standard Installation
To install 3X-UI, run the following command:
bash
bash <(curl -Ls https://raw.githubusercontent.com/mhsanaei/3x-ui/master/install.sh)WARNING
Please note that you need to install curl before executing the command. You can do this by executing the command apt install curl.
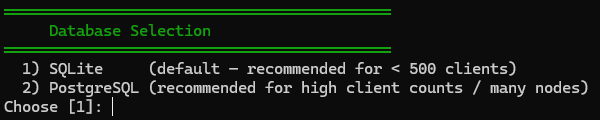
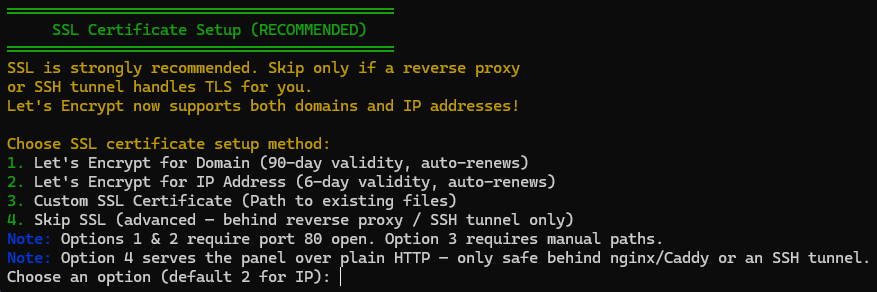
During installation, you will be prompted to:
- Choose the database type (for personal use, SQLite is recommended).
- Change panel settings (recommended to answer
yfor increased security).
- Specify the panel port (recommended to use a non‑standard port).

- Create an SSL certificate for a domain or IP address (recommended to create at least for the IP address, option 2).
Installing a Specific Version
To install a specific version, add the version number at the end of the installation command. For example, for version v1.7.9:
bash
VERSION=v1.7.9 && bash <(curl -Ls "https://raw.githubusercontent.com/mhsanaei/3x-ui/$VERSION/install.sh") $VERSIONDocker Installation
- Install Docker:
bash
bash <(curl -sSL https://get.docker.com)- Clone the project repository:
bash
git clone https://github.com/mhsanaei/3x-ui.git
cd 3x-ui- Start the service:
bash
docker compose up -dOr alternatively:
bash
docker run -itd \
   -e XRAY_VMESS_AEAD_FORCED=false \
   -v $PWD/db/:/etc/x-ui/ \
   -v $PWD/cert/:/root/cert/ \
   --network=host \
   --restart=unless-stopped \
   --name 3x-ui \
   ghcr.io/mhsanaei/3x-ui:latest
SSL Certificate Configuration
There are several ways to configure an SSL certificate in 3x-ui
ACME
To manage SSL certificates using ACME:
- Make sure your domain correctly points to this server (i.e., the A record in DNS is configured correctly).
- Run the
x-uicommand in the terminal, then selectSSL Certificate Management(option 19). - You will be presented with the following options:
- Get SSL (Domain): Obtain an SSL certificate for a domain.
- Revoke: Revoke existing SSL certificates.
- Force Renewal: Force renewal of SSL certificates.
- Show Existing Domains: Display all domain certificates available on the server.
- Specify Certificate Paths for the Panel: Specify a certificate for your domain to be used by the control panel.
- Get SSL Certificate for IP Address: Obtain an SSL certificate for the IP address.
Certbot
To install and use Certbot, simply enter these commands:
bash
apt-get install certbot -y
certbot certonly --standalone --agree-tos --register-unsafely-without-email -d yourdomain.com
certbot renew --dry-run- where
yourdomain.comis your domain
WARNING
Please note that Certbot supports the creation of SSL certificates only for domains.
Logging into the Web Panel
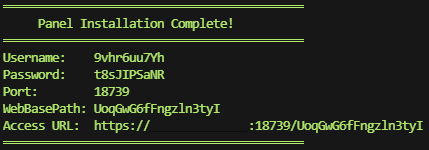
After installing the control panel, copy the credentials in a safe space or memorize them. If the installation was successful, you will be provided with login data in this format:
Setting Up Connections (Inbounds)
Creating a New Connection
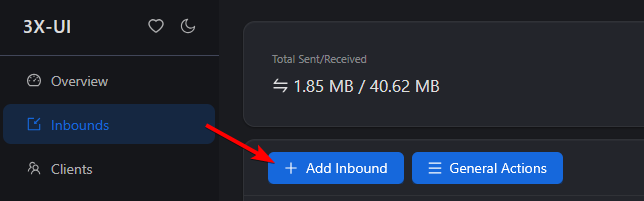
- Go to the "Inbounds" page
- Click the "Add inbound" button to create a new connection
- In the opened window, enter any convenient name in the "Remark" field
- Select the protocol type (VMess, VLESS, Trojan, ShadowSocks, or WireGuard)
Protocol Configuration
For VLESS + Reality (recommended for bypassing restrictions)
- Select security type —
Reality. - Set uTLS —
firefox(some setups may require a different uTLS). - In the "Dest" field enter, for example:
dl.google.com:443. - In the "SNI" field enter, for example:
dl.google.com. - Click
Get New CertandGet New Seedto automatically generate keys. - Click Create to save and add the inbound.
User Management
Creating and setting up a client
- Go to the "Clients" page
- Click the "Add Clients" button to create a new client
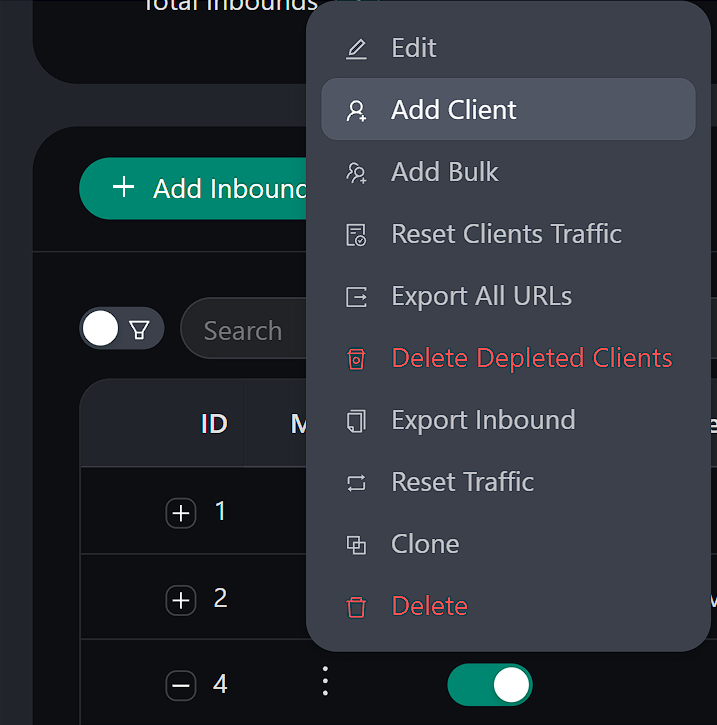
- In the opened window, the panel will offer all necessary data for the client to work correctly, but you can modify it.
- Select which inbounds to attach to the client in the "Attached inbounds" field. You can select the previously created inbound.
Setting limits
For each client you can configure:
- Traffic limit (in gigabytes)
- Expiration date (in days)
- Enable or disable the client
- IP address limit (number of simultaneous connections)
Client Connection
Windows, macOS, and Linux
Recommended clients:
Hiddify(Windows, Linux, macOS)NekoRay(Windows, Linux)
To connect:
- In the 3X-UI web panel click the QR code for the desired user.
 Or copy the subscription/connection link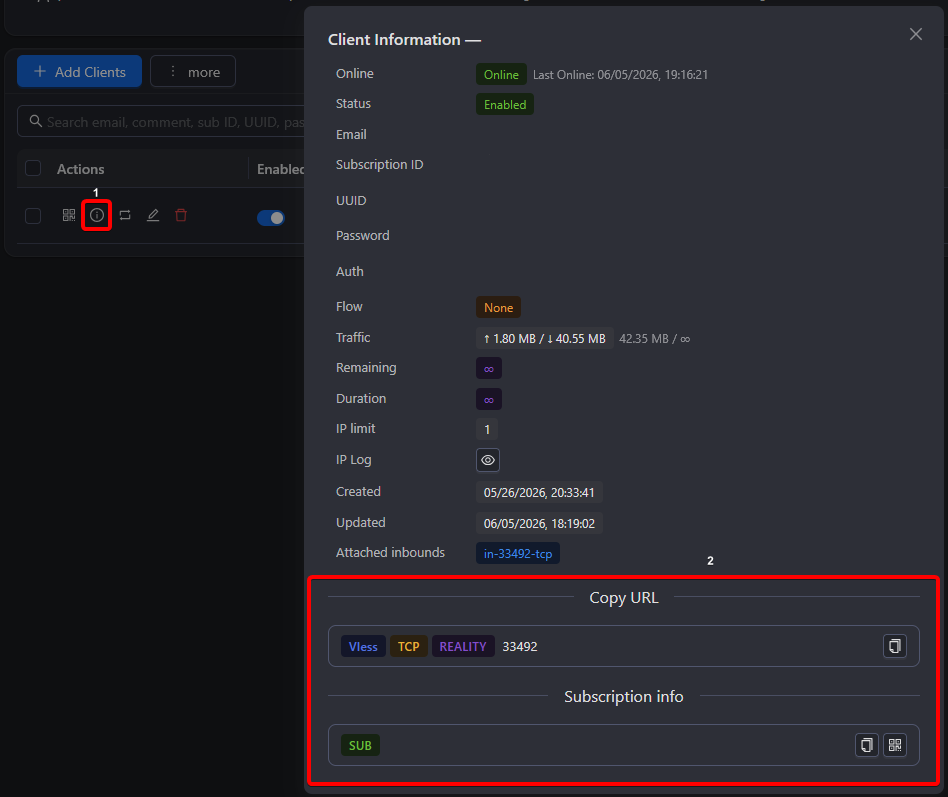
- Copy the configuration or scan the QR code with your VPN client.
- Import the configuration into the client and connect.
Android
Recommended clients:
Hiddifyv2rayNG
To connect:
- Install the client from Google Play
- In the 3X-UI web panel, click on the QR code of the desired user Or copy the subscription/connection link
- Scan the QR code using the VPN client or copy and import the configuration.
- Connect using the imported configuration.
iOS
Recommended clients:
FoXrayv2boxShadowRocket
To connect:
- Install the client from the App Store
- In the 3X-UI web panel, click on the QR code of the desired user Or copy the subscription/connection link
- Scan the QR code using the client or copy and import the configuration
- Connect using the imported configuration
Monitoring and Statistics
In the 3X-UI web panel, you can monitor user activity:
- Total traffic consumption
- Traffic usage by user
- Connection status
- User subscription expiration dates
- IP address usage
IPv6 Traffic Routing
Our hosting clients have access to a special IPv6 subnet without ads from popular services (e.g., YouTube). To use it correctly, additional configuration is required. This guide uses YouTube as an example to set up IPv6 routing only for that service.
Creating an Outbound
In the left sidebar of the panel, open the Xray Configs tab, go to Outbounds, then click "+ Outbounds": 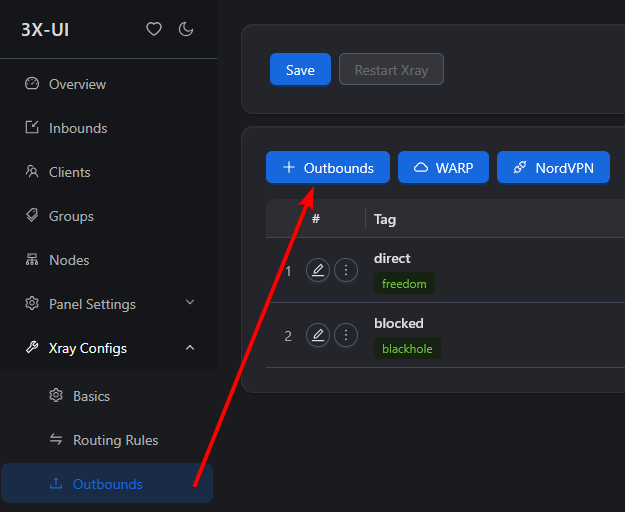
Fill in the fields as follows:
- Protocol —
freedom - Tag —
ipv6-freedom - Strategy —
ForceIPv6
Your Outbound should look like this: 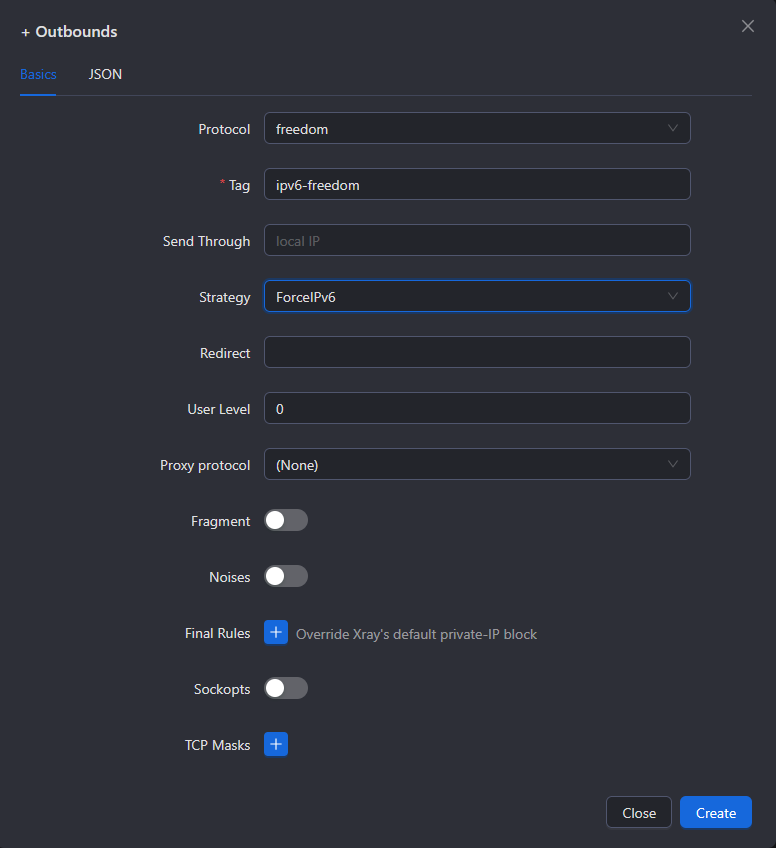
Click "Create", then save the changes in the top left and restart Xray: 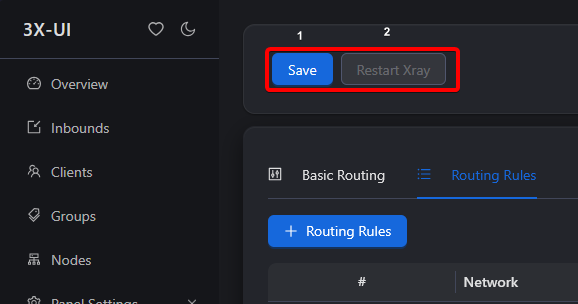
Creating a Routing Rule
In the same tab, go to Routing Rules and click "+ Routing Rules": 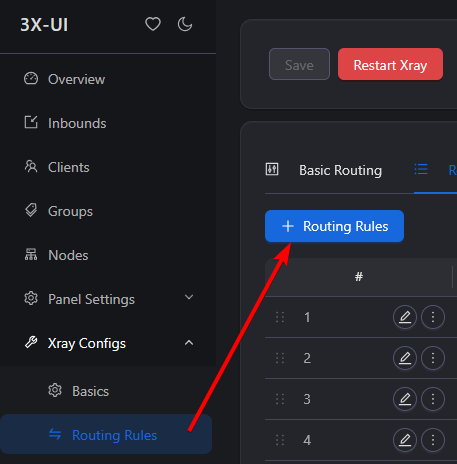
Fill in the fields as follows:
- Domain name — enter:
geosite:youtube,domain:googlevideo.com - Inbound tags — select the inbound for which this rule will be active
- Outbound tag — select the previously created outbound
ipv6-freedom
Your rule should look like this: 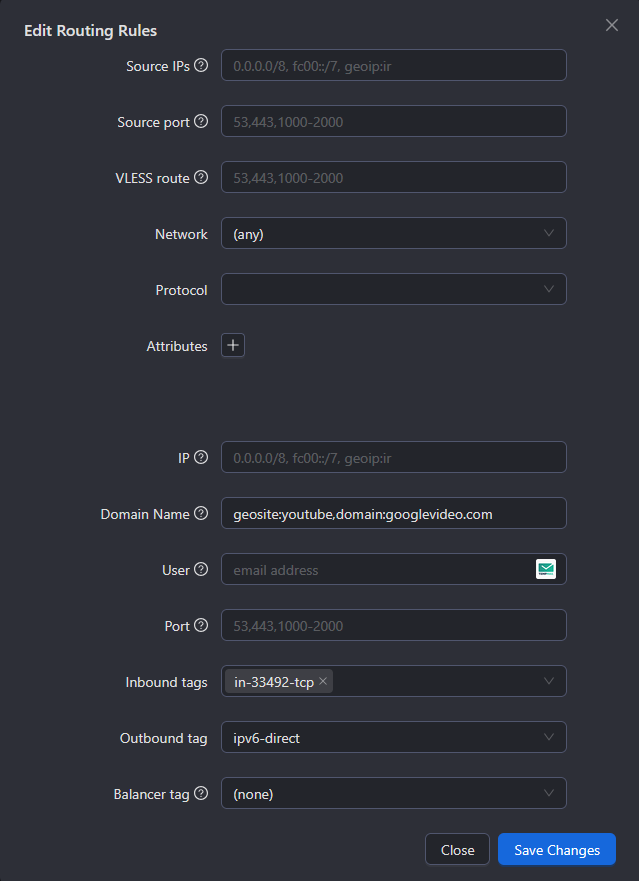
Click "Create", then move your rule to position 2: 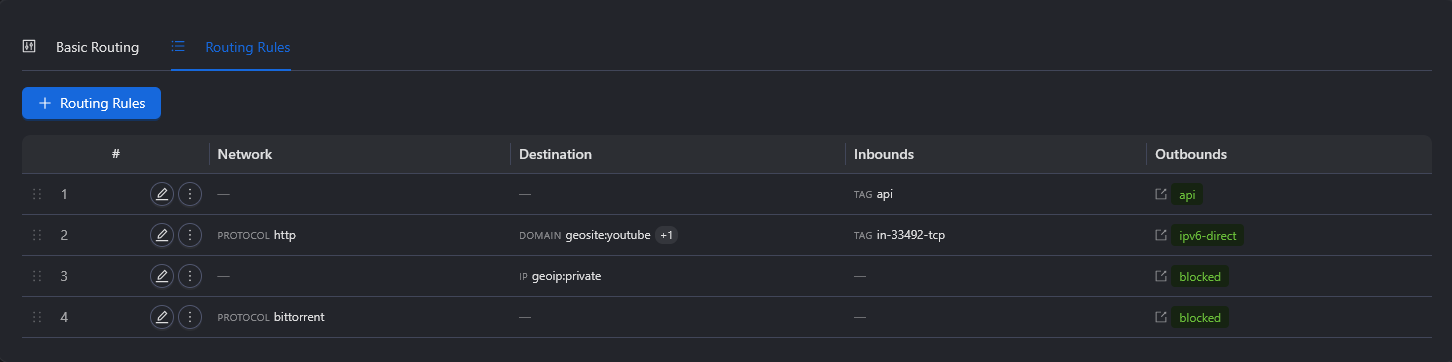
TIP
You can change the position using these buttons: 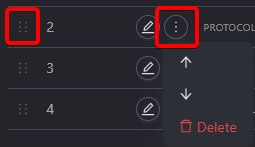
Save the changes in the top left and restart Xray:
Updating 3x-ui
To update the panel to the latest version, run the following command:
bash
bash <(curl -Ls https://raw.githubusercontent.com/mhsanaei/3x-ui/master/install.sh)If you're using Docker, you'll need to run the following commands:
bash
cd 3x-ui
docker compose down
docker compose pull 3x-ui
docker compose up -d
Troubleshooting
Default Settings
- Port:
2053 - Database path:
/etc/x-ui/x-ui.db - Xray configuration path:
/usr/local/x-ui/bin/config.json
Additional Xray Settings
In the web panel, you can configure additional Xray options:
- Ad blocking
- Blocking IP addresses from specific countries
- Domain blocking
- Routing Google, Netflix, Spotify, OpenAI (ChatGPT) through WARP
WARP Configuration
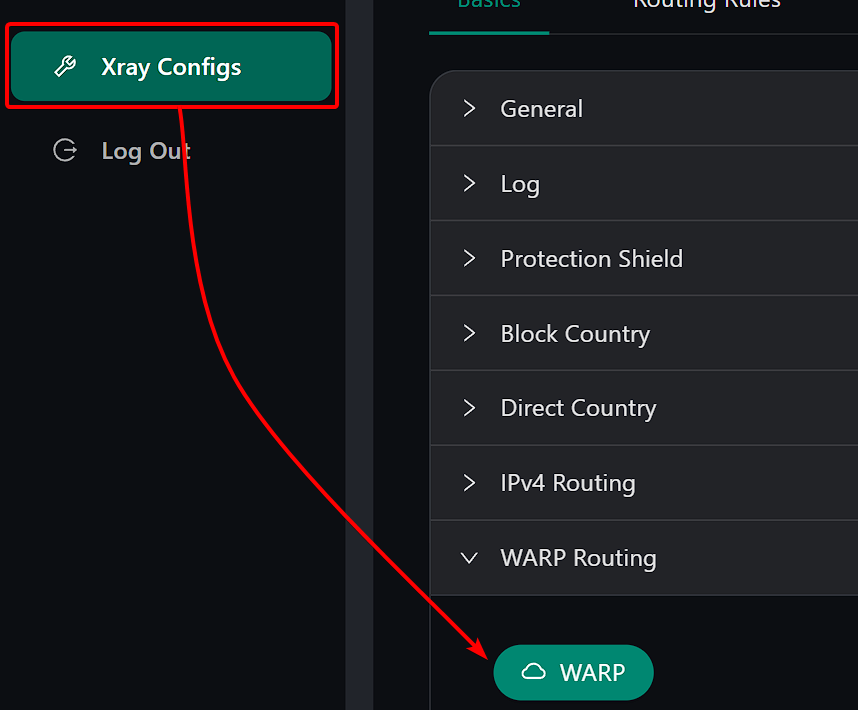
For versions v2.1.0 and later — WARP is built-in and does not require additional installation.
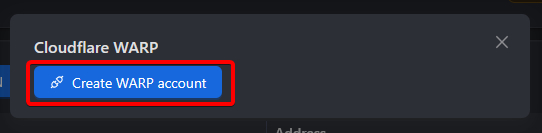
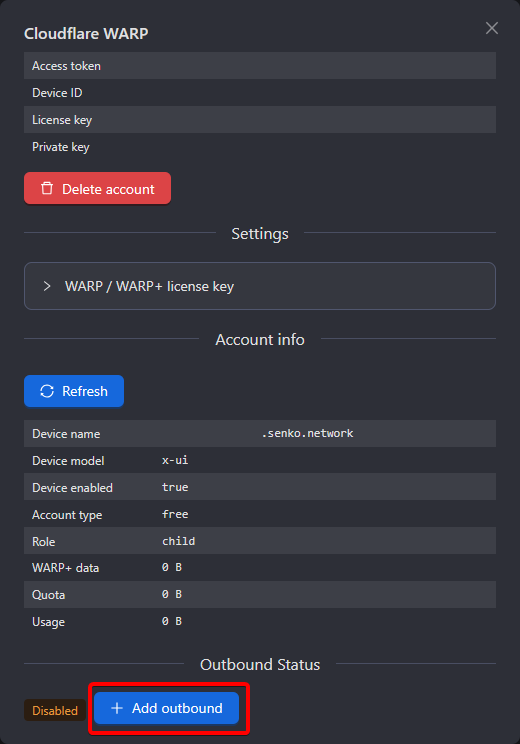
Simply enable the desired configuration in the panel, create an account, and add an Outbound.